What is Xen?
Xen is an open-source type-1 or baremetal hypervisor, which makes it possible to run many instances of an operating system or entirely different operating systems in parallel on a single machine (or host). Xen is used as the basis for a number of different commercial and open source applications, such as: server virtualization, Infrastructure as a Service (IaaS), desktop virtualization, security applications, embedded and hardware appliances. Xen enables users to increase server utilization, consolidate server farms, reduce complexity, and decrease total cost of ownership. The Xen® Hypervisor powers the world's largest clouds in production and is the foundation of many commercial products such as Amazon Web Services, Rackspace Public Cloud and many others. Xen is 9 years old and its stability as well as versatility is second to none.
Xen Virtual Networking
Xen provides a few different networking options as do many hypervisors. They include Bridged networking, Network Address Translation (NAT networking) and Routed networking.
Bridging is a technique used for connecting different network segments. It is the default option for many hypervisors including Xen. This type of networking simply connects all of the virtual machines to the outside world through a set of Virtual Network interfaces which are connected to the bridges created by Xen or the host operating system if you are using another hypervisor.
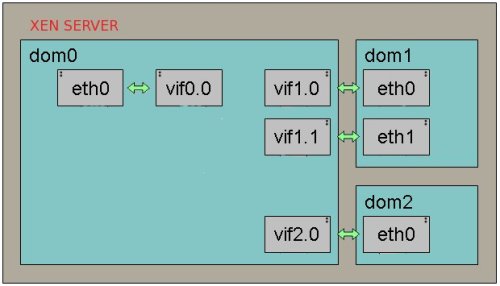
When using bridged networking, Xen will create a network bridge and then connects the physical network interface to this bridge, this can be done for each physical interface on a system. Virtual network interfaces (vif) are then created for dom0 and each of the guest domains. Each of these are attached to the network bridge. In this manner, all the domains or guest can connect to any address to which the physical network interface can connect.
Host:  Fake eth0 -> vif0.0 -+
                            |
                          Bridge -> Real eth0 -> The Network
                            |
Guest: Fake eth0 -> vifN.0 -+
Bridged
This documentation applies to Xen < 4.2 using Xend and not the XL tool stack
Many of the concepts are the same across Xen and other virtualization stacks. Only some of the specific configuration methods differ. The XL tool stack removes some of the network automation provided by the xend network scripts. The XL tool stack instead requires the use the network configuration tools provided by the host specific distribution.
In the Xend configuration file /etc/xen/xend-config.sxp, the default directives related to the virtual network are shown below. Notice that the network-bridge and vif-bridge lines are the only ones uncommented. These are the lines needed for bridged networking.
(network-script network-bridge)

(vif-script vif-bridge)

# (network-script network-route)
# (vif-script vif-route)

# (network-script network-nat)
# (vif-script vif-nat)
The network script network-bridge is in the directory /etc/xen/scripts. It sets up the networking environment and uses the bridge-utils tool to set up the software bridge xenbr0. The vif script vif-bridge is also in the same directory as the network script. It sets up the backend vif for the guest domain when a guest domain boots up.
Before creating any guest domains if you check the network interfaces in Dom0 by typing ifconfig, you can see an output like the following.
[root@localhost xen]# ifconfig
eth0   Link encap:Ethernet HWaddr 48:5B:39:89:E5:43
       inet addr:192.168.1.86 Bcast:192.168.1.255 Mask:255.255.255.0
lo	 Link encap:Local Loopback
       inet addr:127.0.0.1 Mask:255.0.0.0
peth0  Link encap:Ethernet HWaddr FE:FF:FF:FF:FF:FF
       inet6 addr: fe80::fcff:ffff:feff:ffff/64 Scope:Link
vif0.0 Link encap:Ethernet HWaddr FE:FF:FF:FF:FF:FF
       inet6 addr: fe80::fcff:ffff:feff:ffff/64 Scope:Link
xenbr0 Link encap:Ethernet HWaddr B2:8B:2C:4C:ED:0E
       UP BROADCAST RUNNING NOARP MTU:1500 Metric:1
To better understand how the vif(s) and bridges are connected lets take a closer look at the sequence of events that happen when during the boot up and as xend starts.
Only starting dom0 is started in this break out and no guest domains are set to auto start by xend. There is one physical network interface on the server and it is named eth0.
- Execute the
/etc/xen/scripts/network-bridgescript in/etc/xen/xend-config.sxp - This will create a new network bridge called xenbr0.
- Copy the MAC address and IP address from the physical network interface eth0.
- Stop the physical network interface eth0.
- Create a new pair of connected virtual ethernet interfaces (veth) — veth0 and vif0.0.
- Assign the previously copied MAC address and IP address to the virtual interface veth0.
- Rename the physical network interface to peth0 from eth0.
- Rename the virtual network interface veth0 to eth0.
- Attach peth0 and vif0.0 to the bridge xenbr0.
- Bring up the bridge xenbr0, and the network interfaces peth0, eth0, and vif0.0.
For each new domU, Xen creates a new pair of “connected virtual ethernet interfaces”, with one end in domU and the other in dom0. For linux domU’s, the device name it sees is named eth0. The other end of that virtual ethernet interface pair exists within dom0 as interface vif<id#>.0. When a domU is shutdown, the virtual ethernet interfaces for it are deleted.
When a domU (Guest) starts up, xend (running in dom0) runs the vif-bridge script, which performs a few operations on the host.
- Attach vif<id#>.0 to xenbr0.
- vif<id#>.0 is brought up on the host.
- eth0 is ready to be assigned in the domU.
After a guest is brought online and its interfaces are brought up they would appear on the host. If we were to run ifconfig again the additional interfaces would now be visible on the host.
[root@localhost xen]# ifconfig
eth0	 Link encap:Ethernet HWaddr 48:5B:39:89:E5:43
       inet addr:192.168.1.86 Bcast:192.168.1.255 Mask:255.255.255.0
lo	 Link encap:Local Loopback
	 inet addr:127.0.0.1 Mask:255.0.0.0
peth0  Link encap:Ethernet HWaddr FE:FF:FF:FF:FF:FF
	 inet6 addr: fe80::fcff:ffff:feff:ffff/64 Scope:Link
vif0.0 Link encap:Ethernet HWaddr FE:FF:FF:FF:FF:FF
       inet6 addr: fe80::fcff:ffff:feff:ffff/64 Scope:Link
vif1.0 Link encap:Ethernet HWaddr FE:FF:FF:FF:FF:FF
       inet6 addr: fe80::fcff:ffff:feff:ffff/64 Scope:Link
vif2.0 Link encap:Ethernet HWaddr FE:FF:FF:FF:FF:FF
       inet6 addr: fe80::fcff:ffff:feff:ffff/64 Scope:Link
xenbr0 Link encap:Ethernet HWaddr B2:8B:2C:4C:ED:0E
       UP BROADCAST RUNNING NOARP MTU:1500 Metric:1
Note the newly added interfaces vif1.0 and vif2.0, which are virtual interfaces for the new guest domains created. Inside the guest domain, the network interfaces look the same as they would on a typical machine.
[user@DomU]# ifconfig -a
eth0	 Link encap:Ethernet HWaddr 00:16:3E:5A:32:DA
       inet addr:128.153.144.96 Bcast:128.153.145.255 Mask:255.255.254.0
       inet6 addr: fe80::216:3eff:fe5a:32da/64 Scope:Link
lo	 Link encap:Local Loopback
       inet addr:127.0.0.1 Mask:255.0.0.0
       inet6 addr: ::1/128 Scope:Host
Each DomU (guest domain) will have it's own configuration file where all of the settings can be specified for for the system including the network settings associated with that domain. It is specified as the following in the corresponding configuration file.
vif = [“mac=00:16:3E:02:00:41,bridge=xenbr0” ]
vif = [ "key1 = value1", "key2 = value2" ]
The common options used for this configuration directive are.
| Option | Description |
|---|---|
| bridge | Specifies the network bridge that will be used for this interface. |
| mac | Specifies the MAC address for this virtual interface. If you do not provide a MAC address, it is set to a random MAC address by Xen on boot. The random address is selected from the range of addresses assigned to Xensource by IEEE. |
Renaming the bridge
If you want to use a bridge name other than the default one (xenbr0) you can specify it in the xend configuration.
(network-script 'network-bridge bridge=<name>')
| Option | Description |
|---|---|
| bridge=<name> | Specifies the desired name of bridge. |
Selecting a different physical interface
The network-bridge by default binds eth0 to the bridge. To change the physical network card, use netdev.
(network-script 'network-bridge bridge=<name> netdev=<device>')
| Option | Description |
|---|---|
| bridge=<name> | Specifies the desired name of bridge. |
| netdev=<device> | Specifies the physical interface to us on this bridge. |
Setting up Multiple Bridge Devices
If a server has more than one physical network interface, it may be useful to separate traffic between interfaces by creating additional bridges. In this way, one could connect xenbr0 to peth0 and xenbr1 to peth1. Then give a virtual machine in say dom1 exclusive access to xenbr1 or separate public and private networks on each domain. Everything necessary for this is already present in the network-bridge script.
In order to create the bridges automatically during boot /etc/xen/xend-config.sxp can be modified. By default xend calls the network-bridge script, however this script can only be called once during start up. To work around this problem, we can create a network-wrapper script. xend can be configured to use this network-script instead once it is place in /etc/xen/scripts
- Create a script /etc/xen/scripts/network-multi-bridge
#!/bin/sh
dir=$(dirname "$0")
"$dir/network-bridge" "$@" vifnum=0 bridge=xenbr0 netdev=eth0
"$dir/network-bridge" "$@" vifnum=1 bridge=xenbr1 netdev=eth1
sleep 2
if [[ $1 == 'start' ]]
then
	sleep 2
	echo '[ !! ] Enable STP'
	brctl stp xenbr0 on
	brctl stp xenbr1 on
fi
This starts each bridge and sets up the bridges using Xen instead of a regular bridge configuration handled by the host. The second section enables Spanning Tree Protocol on each bridge to help prevent collisions and conflicts.
- Modify /etc/xen/xend-config.sxp so that it calls this network wrapper script by replacing:
(network-script network-bridge)
and then adding:
(network-script network-multi-bridge)
- Then update the configurations for each of the unprivileged domains that should have a vif(s) on each bridge. This can be done changing the information in
/etc/xen/domain_namevif = [ "mac=00:16:3e:6e:db:f3,bridge=xenbr0", "mac=00:16:3e:23:f5:ec,bridge=xenbr1" ]
Data Flow
Have a look at the packet flow in bridged networking. In a bridged networking the bridge itself works very much like a conventional switch. It will move the packet over an Ethernet broadcast address and relay the packets.
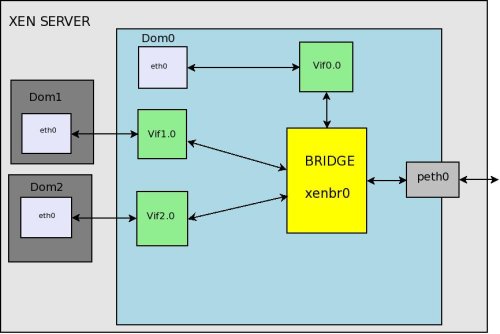
- A packet arrives at the hardware and is handled by the dom0 Ethernet driver and appears on peth0. peth0 is bound to to the bridge and the packet is there for passed to the bridge. We can see that peth0, xenbr0, vif0.0, and vif1.0 are sharing the same MAC address FE:FF:FF:FF:FF:FF. This is the Ethernet broadcast address. This indicates that the physical interface, the loopback device of Domain0, and the backend interfaces of individual guest domains are all broadcasting to the bridge interface xenbr0.
- When the physical network interface receives a packet, it sends the packet directly to the bridge interface xenbr0.
- The bridge distributes the packet, just like a switch would. The software bridge determines which domain’s backend interface to forward those packets to by the receiver’s MAC addresses. Since this is the case peth0 does not need to have an IP, only a MAC address.
- The vif interface puts the packet into Xen.
- Xen then puts the packet into the network stack for the the domain the vif leads to.
** Its also done that way for dom0, hence the vif0.0 -> eth0 pair.
Virtual Disk
Guest use virtual disks which can be based on the following types of physical devices and files. There are a number of methods to create and connect this disks or images to a guest.
| Option | Description |
|---|---|
| phy:/dev/cdrom | A physical disk device, such as a DVD, that is accessible as a device to the host. |
| file:/mnt/disks/sles10sp1.iso | A file that contains a disk image accessible from the file system of the host. Disk images can be encoded as raw, QEMU, or Vmware. |
| tap:qcow:/mnt/disks/sles10sp1.iso.qcow tap:vmdk:/mnt/disks/sles10sp1.iso.vmdk |
tap:aio:/mnt/disks/sles10sp1.iso specifies a raw disk that might be taken from a different virtualization platform or created for the guest. |
| iscsi:iqn.2001-04.com.acme@0ac47ee2-216e-452a-a341-a12624cd0225 | A remote storage device specified using the Internet SCSI (iSCSI) protocol. |
| npiv:210400e08b80c40f | A remote storage device specified using a Fibre Channel (NPIV) protocol. |
If you are adding a disk to an existing Guest you may have to specify a mapping between the physical storage and the virtual disk. To do this you will need to edit the virtual machine’s disk information. See Modifying Settings.
Example: Virtual Machine Output from Xend
(vbd
  (dev xvda:disk)
  (uname file:/var/lib/xen/images/sles11/disk0)
  (mode w)
  (type disk)
  (backend 0)
)
Available uname Settings
| Protocol | Description | Example |
|---|---|---|
| phy: | Block devices, such as a physical disk, in domain 0 | phy:/dev/sdc |
| file: | Raw disk images accessed by using loopback | file:/path/file |
| nbd: | Raw disk images accessed by using NBD | ndb: ip_port |
| tap:aio: | Raw disk images accessed by using blktap. Similar to loopback but without using loop devices. | tap:aio:/path/file |
| tap:cdrom | CD reader block devices | tap:cdrom:/dev/sr0 |
| tap:vmdk: | VMware disk images accessed by using blktap | tap:vmdk:/path/file |
| tap:qcow: | QEMU disk images accessed by using blktap | tap:qcow:/path/file |
| iscsi: | iSCSI targets using connections initiated from domain 0 | iscsi:IQN,LUN |
| npiv: | Fibre Channel connections initiated from domain 0 | npiv:NPIV,LUN |
blktap
One of the more commonly used Virtual Disk methods is blktap in conjunction with aio or qcow2. The blktap 'block tap' userspace toolkit provides a user-level disk I/O interface. Its main purpose is to replace the common loopback driver for file-based images as it provides better performance.
The blktap mechanism involves a kernel driver running in Dom0 that acts in a similar manner as the existing Xen/Linux blkback driver and a set of associated user-level libraries. Using these tools, blktap allows virtual block devices presented to guest to be implemented in userspace and then backed by raw partitions, files, networks, etc.
Advantages
The key benefits of blktap is that it makes it easy and fast to write arbitrary block backends. These user-level backends actually perform very well.
- Metadata disk formats such as Copy-on-Write, encrypted disks, sparse formats and other compression features can be easily implemented.
- Accessing file-based images from userspace can avert problems related to flushing dirty pages which are present in the Linux loopback driver. (Specifically, doing a large number of writes to an NFS-backed image will not result in the OOM killer going berserk.)
- Per-disk handler processes enable easier userspace policing of block resources. QoS techniques may be trivially applied to block devices. (Disk scheduling and related tools.)
- It is very easy to take advantage of userspace facilities such as networking libraries, compression utilities, peer-to-peer file-sharing systems and so on to build more complex block backends.
- Crashes are contained -- incremental development and debugging is very fast.
How blktap Works
Working in conjunction with the kernel blktap driver, all disk I/O requests from VMs are passed to the userspace daemon (using a shared memory interface) through a character device. Each active disk is mapped to an individual device node, allowing per-disk processes to implement individual block devices where desired. The userspace drivers are implemented using asynchronous (Linux libaio), O_DIRECT-based calls to preserve the unbuffered, batched and asynchronous request dispatch achieved with the existing blkback code.
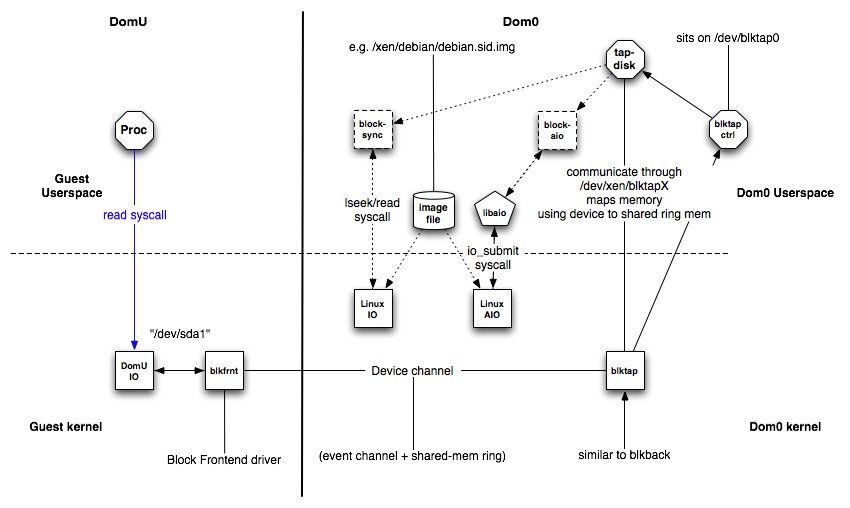
blktap consists of the following components:
blktapkernel driver in Dom0blkfrontinstance of the driver in DomUXenBusconnecting blkfront and blktap
This is similar to the general XenSplitDrivers architecture. Additionally blktap has the following components in Dom0:
/dev/blktap0, a character device in Dom0/dev/xen/blktapX, where X is a number which represents one particular virtual diskblktapctrl, a daemon running in userspace, that controls the creation of new virtual diskstapdisk, each tapdisk process in userspace is backed by one or several image files/var/run/tap/tapctrlreadX,/var/run/tap/tapctrlwriteX; named pipes used for communication between the individual tapdisk processes and blktapctrl using the write_msg and read_msg functions.- A frontend ring
(fe_ring)for mapping the data of the I/O requests from the Guest VM to the tapdisk in userspace. - A shared ring
(sring)for communication
The Linux kernel driver in /drivers/xen/blktap/ reacts to the ioctl, poll and mmap system calls.
Sparse Image Files and Disk Space Allocation
If the host’s physical disk reaches a state where it has no available space, a virtual machine using a virtual disk based on a sparse image file is unable to write to its disk. Consequently, it reports I/O errors.
Some filesystems such as the Reiser file system, perceiving a corrupt disk environment, automatically sets the file system to read-only. If this situation happens, you should free up available space on the physical disk, remount the virtual machine’s file system, and set the file system back to read-write.
To check the actual disk requirements of a sparse image file, use the command du.
[root@Dom0 ~]# du -h <image file>
Increasing Image Size
To increase the available space of a sparse image file, first increase the file size and then the file system.
Warning: Make a backup of the image before you proceed !
Touching the sizes of partitions or sparse files always bears the risk of data failure. Do not work without a backup.
Resizing of the image file should be done when the system is down. Resizing can also be done online, while the Guest is running, if it is absolutely necessary, though it is substantially more dangerous.
Increase the size of a sparse image file with:
dd if=/dev/zero of=<image file> count=0 bs=1M seek=<new size in MB>
For example, to increase the file /var/lib/xen/images/sles11/disk0 to a size of 16GB, use the command:
dd if=/dev/zero of=/var/lib/xen/images/sles11/disk0 count=0 bs=1M seek=16000
Non-Sparse
It is also possible to increase the image files of devices that are not sparse files. However, you must know exactly where the previous image ends. Use the seek parameter to point to the end of the image file and use a command similar to the following:
dd if=/dev/zero of=/var/lib/xen/images/sles11/disk0 seek=8000 bs=1M count=2000
Warning: Be sure to use the right seek, else data loss may happen !
After Resizing the Image
Restart the Guest and check the size of the block device inside the guest system with fdisk.
fdisk -l /dev/xvda
The device name depends on the device actually being increased in size.
Once the everything checks out you may need to perform additional operations on the filesystem to inform it of the size change. Such as updating the partition table size, the size of your logical volumes, or using filesystem specific tools inside of the guest to extend your on disk filesystem (e2fs, resier-tools, etc.).
Xm Command
The xm command provides a command line interface for managing virtual machines. It can be used to create, pause, and shut down virtual machines. It can also be used to list the current domains, enable or pin virtual CPUs, and attach or detach block devices. For a complete list of the available xm commands, run xm help.
Note: virsh can also be used on xen based systems and can perform almost all of the operations that xm can.
For each command, there is a detailed help available that is obtained with the extra parameter --help. More information about the respective subcommands is available in the manual page of xm.
For example, the xm list --help displays all options that are available to the list command. As an example, the xm list command displays the status of all virtual machines.
[root@Dom0 ~]# xm list
Name                                 ID    Mem VCPUs        State   Time(s)
Domain-0                              0    457     2       r-----   2712.9
OES                                   7    512     1       -b----     16.3
SLES10                                     512     1                  12.9
The State information tells if a machine is running, and in which state it is. The most common flags are r ( running ) and b ( blocked ) where blocked means it is either waiting for IO, or just sleeping because there is nothing to do. For more details about the state flags, see man 1 xm.
The syntax of the xm command usually follows the format:
xm <subcommand> [domain-id] [OPTIONS]
Where subcommand is the xm command to run, domain-id is the ID number assigned to a domain or the name of the virtual machine, and OPTIONS indicates subcommand-specific options.
Other useful xm commands include:
| Commands | Description |
|---|---|
| xm start | Starts a virtual machine |
| xm reboot | Reboots a virtual machine |
| xm destroy | Immediately terminates a virtual machine |
| xm block-list | Displays all virtual block devices attached to a virtual machine |
- All xm operations require that the Xen control daemon, Xend, be running. For this reason, you should make sure Xend starts whenever the host boots.
- Most xm commands require root privileges to allow interaction with the Xen hypervisor. Entering the xm command when you are not logged in as root returns an error.
- Some xm commands return no textual information even though the action is completed. In some instances, for example, when shutting down a virtual machine, the action can take several seconds to complete. To verify that the action has completed, you might need to view its status another way, such as, using the xm list command.
Best Practice
Xen dom0 dedicated memory (No Auto Ballon)
Dedicating fixed amount of memory for dom0 is good for two reasons.
- First the Linux kernel calculates various network related parameters based on the amount of memory available at boot time. ( dom0 )
- The second reason is that Linux needs memory to store memory metadata ( Per page info structures ). This allocation is also based on the amount of memory available at boot time.
For instance if the host system is started with all of the memory visible to dom0 it must then balloon down the dom0 memory every time a new guest is started. As the host continues to balloon it's memory down to accommodate these new guest the total amount of memory allocated to the host is also reduced. This means that the parameters that were originally generated based on the boot time memory allocations will not longer be accurate. In addition to these parameters no longer being accurate there will be additional metadata stored in memory for memory that is no longer allocated to the host there by reducing the overall memory availability to the host.
Keep in mind that most operations on a guest or host require memory. Systems that are busy may consume large amounts of memory while performing normal operations such as serving content to an end user or storing data on a disk. If the host node runs out of memory the OOM system may engage causing vital services to fail on the host. These service failures will impact the operability of guest and in some cases can take an entire host node and it's guest offline.
Setting dedicated memory
Setting a dedicate amount of memory can be done by specifying dom0_mem=512M,max:512M option for the Xen hypervisor (xen.gz) in grub.conf/menu.lst. This makes sure that the initial amount of memory allocated for dom0 is 512 MB (note: Replace this value with the amount of memory you want to allocate to dom0) and leaves the rest of the host system's RAM available for other guests.
title Xen 4.1.0 / pv_ops dom0 kernel 2.6.32.36
        root (hd0,0)
        kernel /xen-4.0.gz dom0_mem=512M,max:512M loglvl=all guest_loglvl=all
        module /vmlinuz-2.6.32.36 ro root=/dev/sda2 console=hvc0 earlyprintk=xen nomodeset
        module /initrd-2.6.32.36.img
The next step is to configure the toolstack to make sure dom0 memory is never ballooned down while starting new guests:
- If you are using the XL toolstack this can be done by editing
/etc/xen/xl.confand settingautoballoon=0. This will prevent XL from ever automatically adjusting the amount of memory assigned to dom0. - If you are using the xend toolstack this can be done by editing
/etc/xen/xend-config.sxpand changing thedom0-min-memoption (dom0-min-mem 512) and changing the "enable-dom0-ballooning" option (to "enable-dom0-ballooning no"). These options will make sure xend never takes any memory away from dom0.
After making these changes to grub.conf and to xend-config.sxp or xl.conf, you will need to reboot the system. After reboot you will notice dom0 has only 512 MB of memory, and the rest of the RAM is available in Xen hypervisor as a free memory.
You can run "xl list" or "xm list" to verify the amount of memory dom0 has.
[root@Dom0]$ xm list
Name                                      ID Mem(MiB) VCPUs State   Time(s)
Domain-0                                   0      512     4 r-----  42544.7
ser.server1.com                          9     1024     2 -b----    676.9
ser.server2.com                          8     1024     2 -b----   1022.0
You can then run "xl info" or "xm info" to verify the amount of free memory in Xen hypervisor.
[root@Dom0]$ xm info
host                   : Dom0.server11.com
release                : 2.6.18-348.1.1.el5xen
version                : #1 SMP Tue Jan 23 17:00:37 EST 2013
machine                : x86_64
nr_cpus                : 4
nr_nodes               : 1
sockets_per_node       : 1
cores_per_socket       : 2
threads_per_core       : 2
cpu_mhz                : 2926
hw_caps                : bfebfbff:28100800:00000000:00000940:0098e3fd:00000000:00000001
total_memory           : 4086
free_memory            : 1413
node_to_cpu            : node0:0-3
xen_major              : 3
xen_minor              : 1
xen_extra              : .2-348.1.1.el5
xen_caps               : xen-3.0-x86_64 xen-3.0-x86_32p hvm-3.0-x86_32 hvm-3.0-x86_32p hvm-3.0-x86_64
xen_pagesize           : 4096
platform_params        : virt_start=0xffff800000000000
xen_changeset          : unavailable
cc_compiler            : gcc version 4.1.2 20080704 (Red Hat 4.1.2-54)
cc_compile_by          : mockbuild
cc_compile_domain      : (none)
cc_compile_date        : Tue Jan 22 16:10:44 EST 2013
xend_config_format     : 2
Xen Credit Scheduler ( dom0 CPU Priority )
The credit scheduler is a proportional fair share CPU scheduler built from the ground up to be work conserving on SMP hosts. Each CPU manages a local run queue of runnable VCPUs. This queue is sorted by VCPU priority. A VCPU's priority can be one of two value: over or under representing whether this VCPU has or hasn't yet exceeded its fair share of CPU resource in the ongoing accounting period. When inserting a VCPU onto a run queue, it is put after all other VCPUs of equal priority to it.
As a VCPU runs it consumes credits. Every so often a system-wide accounting thread recomputes how many credits each active VM has earned and bumps the credits. Negative credits imply a priority of over.
Each domain including the host is assigned a weight and a cap.
| Option | Description |
|---|---|
| Weight | A domain with a weight of 512 will get twice as much CPU as a domain with a weight of 256 on a contended host. Valid weights range from 1 to 65535 and the default is 256. |
| cap | The cap fixes the maximum amount of CPU a domain will be able to consume, even if the host system has idle CPU cycles. The cap is expressed in a percentage of a single physical CPU. 100% is 1 physical CPU, 50% is half a CPU, 400 is 4 CPUs, etc. The default, 0, means there is no upper cap. |
| SMP Balancing | The credit scheduler automatically load balances guest VCPUs across all available physical CPUs on an SMP host. The administrator does not need to manually pin VCPUs to load balance the system. However, one can restrict which CPUs a particular VCPU may run on using the generic vcpu-pin interface. |
Setting Priority
For smooth operation and good guest performance you need to make sure that dom0 always gets enough CPU time to process and serve the I/O requests for guest. This can be done by setting up the Xen credit scheduler domain weights and caps.
By default Xen gives every guest, including dom0, the default weight of 256. This means that all guests, including dom0, are equal and each of them will get the same amount of CPU time. This can create performance problems on dom0 since it is responsible for serving and processing the I/O requests for other guests. To alleviate this issue dom0 should have more weight than its guest so that it will get more CPU time and a higher priority when it is required for I/O operations.
To Check the current weight of a guest or dom0.
xm sched-credit -d Domain-0
To set a weight for a guest or dom0.
xm sched-credit -d Domain-0 -w 512
The above command will give dom0 a weight of 512. This will give it more CPU time and a higher priority ( Up to twice as much ) than the guests.
Note: That you need to apply this setting after every reboot! It is not a persistent setting. To make this more automatic place the xm sched-credit -d Domain-0 -w 512 in rc.local or other another script that is executed late in the boot process. Make sure the command is executed after xend is started since the xm command needs to talk to xend.
The XL tool stack adds additional scheduler controls which are only available in Xen 4.2+
Installing a Guest ( virsh )
Image creation (optional)
There are a number of ways to create a blank image file if you intend to work with a file based system. Qcow provides a tool to create image files but if you intend to use a raw file you can simply use dd.
Sparse File
To create sparse file you would use a command similar to the one below. Be aware that sparse files will only appear to take up the maximum seek size. There must be room available on the drive for this image to grow to its maximum allocation during usage.
dd if=/dev/zero of=/vm/somefile bs=1M count=0 seek=100G
Non-Sparse
To create non-sparse file you would use a command similar to the one below. Non-Sparse files are fully allocated images that will utilize the space shown in their metadata.
dd if=/dev/zero of=/vm/somefile bs=1M count=2G
Install using Network
There are a number of different ways that you can install a distribution on a guest using both the xen and virsh tool sets. For the purposes of this article we will use virt-install with a network based installation method instead of physical media.
[root@Dom0 ~]# virt-install --paravirt --name ser.server1.com --vcpus=2 --ram 1024 --file /vm/server1 --file-size 100 --nographics --location http://mirrors.service.softlayer.com/centos/6.3/os/x86_64 --network bridge=xenbr0
The install process is pretty simple using virt-install when can set basic limits, network configurations, virtualization types, and virtual disk configurations. Fill the correct parameters and fire off the installation. Once the Guest is initialized you should dropped into its console with a text based installer. This of course assumes that your distribution provides a text based installer. If that is not the case you will need a VNC server with an Xwindows backend.
| Options | Description |
|---|---|
| --paravirt | Paravirtualized virtualization type. |
| --hvm | Fully virtualized virtualization type |
| --name | Guest Name. |
| --vcpus | Number of Allocated CPU(S) |
| --ram | Amount of Allocated RAM. |
| --file | The Virtual Disk. ( RAW File ) |
| --nographics | No Graphics enabled or available to the install media. ( No VNC ) |
| --location | The Install media location. |
| --network | The network configuration for the guest. |
Post Install
Update network configuration on Container
Once your container is online you may need to perform some additional work to get the network and hostname configured correctly.
Update /etc/sysconfig/network
NETWORKING=yes
HOSTNAME=ser.server1.com
GATEWAY=50.23.34.89
Set the correct hostname for your guest here otherwise it will continue to revert to the default setting. Also ensure that networking is set to yes so that it is correctly enabled. Last but not least if you used a private interface and local mirrors to perform the initial installation, such as the SL services, set the Gateway for your public facing addresses.
Working with Virtual Interfaces
Listing Virtual Interfaces
[root@Dom0]$ xm network-list tra.training1.com
Idx BE     MAC Addr.     handle state evt-ch   tx-/rx-ring-ref BE-path
0   0  00:16:3e:6e:db:f4    0     4      14    768/769      /local/domain/0/backend/vif/11/0
1   0  00:16:3e:23:f8:ec    1     4      15    1280/1281    /local/domain/0/backend/vif/11/1
| Options | Description |
|---|---|
| Idx | Device ID. |
| BE | Back-End. |
| MAC Addr. | The Assigned MAC Address.BE-pathThe Back-End path. |
| BE-path | The Back-End Path. |
Temporarily add/remove of vif
Adding a virtual interface
[root@Dom0]$ xm network-attach ser.server1.com bridge=xenbr1 script=vif-bridge
Removing a virtual interface
[root@Dom0]$ xm network-detach ser.server1.com bridge=xenbr1 script=vif-bridge
Making permanent additions/changes ( xend 3.0.x)
In a xend environment you can make these changes permanent by adding the relevant data, shutting down the container and recreating it. Update /etc/xen/$domain for permanent additions.
name = "ser.server1.com"
uuid = "baaaa213-6d28-c55b-4e79-95faedde297f"
maxmem = 1024
memory = 1024
vcpus = 2
bootloader = "/usr/bin/pygrub"
on_poweroff = "destroy"
on_reboot = "restart"
on_crash = "restart"
disk = [ "tap:aio:/vm/server1,xvda,w" ]
vif = [ "mac=00:16:3e:6e:db:f4,bridge=xenbr0", "mac=00:16:3e:23:f8:ec,bridge=xenbr1" ]
Making permanent additions/changes ( xend 3.1.x)
In later versions of xen the process is slightly different. You must instead export the running data by dumping the configuration to a file. Then re-import the file using the xm tools in order to update data in xen-store.
- Dump the Current Configuration
[root@Dom0]$ xm list -l ser.server1.com > myconfig
- Delete the Current configuration in Xen-store
[root@Dom0]$ xm delete ser.server1.com
- Import the Modified Configuration into Xen-Store
[root@Dom0]$ xm new -F ser.server1.com
- Restart the container
[root@Dom0]$ xm start ser.server1.com
Some Information Sourced from:
http://wiki.xen.org/wiki/Blktap
http://doc.opensuse.org/products/draft/SLES/SLES-xen_sd_draft/cha.xen.vbd.html
http://www.sparksupport.com/blog/xen-bridging
You must be logged in to post a comment.